Wie viel Zeit verbringen Sie damit, Termine mit Kunden und Geschäftspartnern auszumachen? Entweder das Telefon klingelt ständig und reißt Sie immer wieder aus Ihrem Workflow heraus oder Sie schreiben unzählige E-Mails, um bei der Terminfindung endlich auf einen Nenner zu kommen. Auch für Ihre Kunden kann das ständige Hin und Her beim Planen und Verschieben von Terminen nervig sein. Die Lösung: Ein Online-Terminbuchungssystem.
Digitales Terminbuchungssystem
Nichts erleichtert heutzutage den Umgang mit Daten mehr als die Möglichkeiten der Digitalisierung. Ein digitales Terminbuchungssystem spart nicht nur Papier, sondern auch Zeit. Wenn Sie normalerweise Termine per Telefon oder Email ausmachen, kostet das Sie und Ihr Gegenüber Zeit und Nerven. Das ganze online zu regeln, bietet Transparenz und reduziert den Arbeitsaufwand auf Ihrer Seite.
Erleichtern Sie Sich und Ihren Kunden die Terminbuchung!
SeaTable bietet hier eine einfache und leistungsstarke Lösung. Mit unseren Webformularen, die Sie bisher vielleicht für Kundenumfragen genutzt haben, lassen sich auch ganz einfach Online-Terminbuchungssysteme erstellen. Die festgelegten Termine erscheinen dann vollautomatisch in Ihrer Tabelle und Sie sehen auf einen Blick, wann welche Termine anstehen.
Die Erstellung dieses Terminbuchungssystems ist ohne Vorkenntnisse garantiert in unter 30 Minuten erledigt! Im Folgenden erklären wir Ihnen die Erstellung eines digitalen Terminbuchungssystems in SeaTable Schritt für Schritt. Damit benötigen Sie kein Terminbuchungssoftware mehr, wie etwa Calendly.
SeaTable kann hier einen intelligenten und adäquaten Ersatz bieten und hat zudem den Vorteil, dass das Terminbuchungssystem selbst gehostet werden kann. Calendly kann durch Zapier in wenigen Schritten mit SeaTable verbunden werden – auch damit funktioniert das Erstellen eines Terminbuchungssystems. Wenn Sie sich jedoch den Umweg über Zapier sparen möchten, dann sehen Sie sich das Terminbuchungssystem mit SeaTable hier genauer an.
Mit der Formular-Funktion zum Terminbuchungssystem
Um ein Terminbuchungssystem in SeaTable zu erstellen, werden wir die Formularfunktion verwenden. Sie können so über einen einfachen Link Informationen von jedem sammeln und automatisch in Ihrer SeaTable Base speichern.
Erstellung Ihrer zwei benötigten Tabellen
Für Ihr Online-Terminbuchungssystem benötigen Sie zwei Bases. Sie können diese zwei Tabellen in eine bereits bestehende SeaTable Base einfügen oder Sie erstellen sich eine neue Base. Natürlich können Sie auch unser fertiges Templates hier kopieren und gegebenenfalls noch an Ihre Bedürfnisse anpassen.
In der ersten Base (Meeting Availability) werden alle Termine eingepflegt, an denen Sie frei verfügbar sind. Die zweite Base (Meeting Schedule) enthält alle Meetings oder Termine, die bereits von Ihren Kunden über die Formulare gebucht wurden. Sie erscheinen nach dem Abschicken des Formulars automatisch in der Tabelle.
Erste Tabelle: Legen Sie Ihre Zeitslots fest
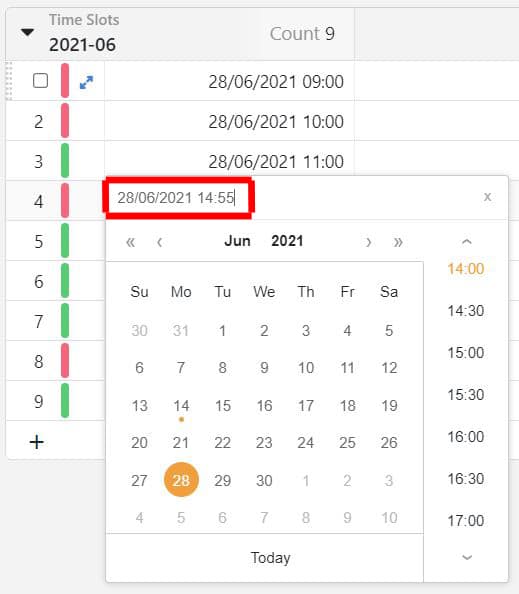
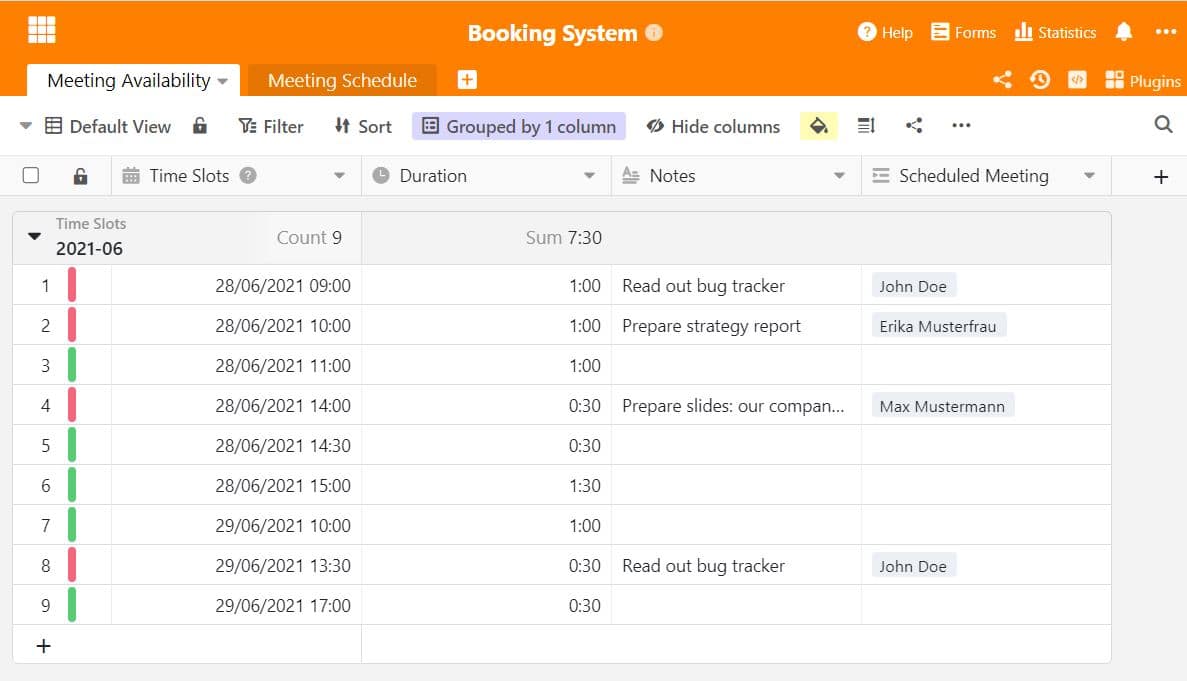
Die erste Tabelle “Meeting Availability” besteht aus 4 Spalten. In der ersten Spalte tragen Sie alle verfügbaren Termine ein, die Sie anbieten können. Wählen Sie hierzu das Datumsformat mit Uhrzeit aus (hierbei den Regler auf “accurate to minute” schieben). Sie können auch manuelle Uhrzeiten einstellen, die nicht im Datumsfenster angezeigt werden; dazu geben Sie die Uhrzeit in der Leiste oben selbst ein.
Die zweite Spalte enthält die jeweilige Dauer des von Ihnen zur Verfügung gestellten Terminslots. Wählen Sie hierzu den Spaltentyp “Duration” und stellen Sie ganz nach Ihren Bedürfnissen einen Zeitdauer ein. Mit der manuellen Einstellung der Uhrzeit sind also auch 5- oder 10-Minuten-Slots machbar.
Die dritte Spalte bietet Platz für Ihre persönlichen Notizen, etwa um was es in dem Meeting geht, was dafür vorbereitet werden muss oder welche Kundeninformationen für das Gespräch relevant sind.
Die vierte Spalte ist mit der zweiten Tabelle verknüpft. Das geht ganz einfach mit der “Link to other records” / “Verknüpfung zu anderen Einträgen” Spalte. Sie enthält Informationen zu dem Kunden, der genau diesen Termin gebucht hat und Sie können sich in Ihrer eigenen Base direkt alle gebuchten Teilnehmer anzeigen lassen.
Mit der Farbfunktion können Sie übrigens mit automatisierten Regeln die Zeilen rot einfärben, auf die bereits ein Termin gebucht wurde und grün, wenn diese Termine noch frei sind.
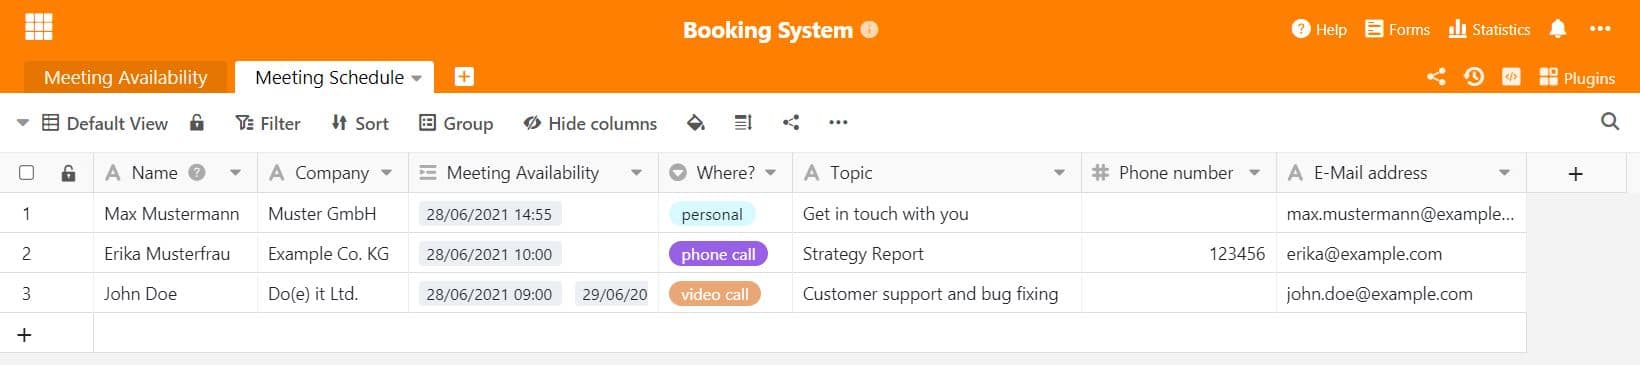
Zweite Tabelle: Alle gebuchten Termine auf einen Blick
Die zweite Tabelle bildet die Basis für Ihr Terminbuchungssystem mit Webformular. Sie sehen im folgenden Bild verschiedene Spalten, die die Informationen der Teilnehmer beinhaltet. Jede Spalte, die Sie hier erstellen, kann nachher im Webformular genutzt werden. Sie können mit den Spaltentypen direkten Einfluss auf die Eingabe von Daten im Formular nehmen. Wenn Sie etwa ein Freitext-Feld haben möchten, so wählen Sie Spalten mit Textfunktion. Soll es eine Art Dropdown-Menü geben, so eignet sich hierfür die Einfach- oder Mehrfachauswahl. Sie sehen die verknüpfte Spalte “Meeting Availability” – die Verknüpfung wird also in beiden Tabellen mit den entsprechenden Informationen aus der 1. Spalte angezeigt.
Mit der Bildung dieser Spalten geht es jetzt an das Webformular. Dafür wählen Sie oben “Forms”, und erstellen dann ein neues Webformular mit der Einstellung “Traditional Form”. Hier können die Teilnehmer nicht selbst auf die Tabelle und die Daten zugreifen. Es öffnet sich eine Formularmaske, bei der Sie nun alle anzuzeigenden Spalten beschriften können.
Wählen Sie dabei die Tabelle aus, in der Sie die Spalten für die Informationsabfrage erstellt haben (hier: “Meeting Schedule”). Sie können selbst auswählen, welche Spalten im Formular angezeigt werden sollen. Hier ist es sinnvoll, alle Spalten mit in das Formular aufzunehmen. Sie können nun jedes Eingabefeld als Pflichtfeld deklarieren oder einen Beschreibungstext hinzufügen, ebenso wie Ihr persönliches Firmenlogo als Header einfügen. Damit erhalten Sie Ihr ganz persönliches Terminbuchungssystem.
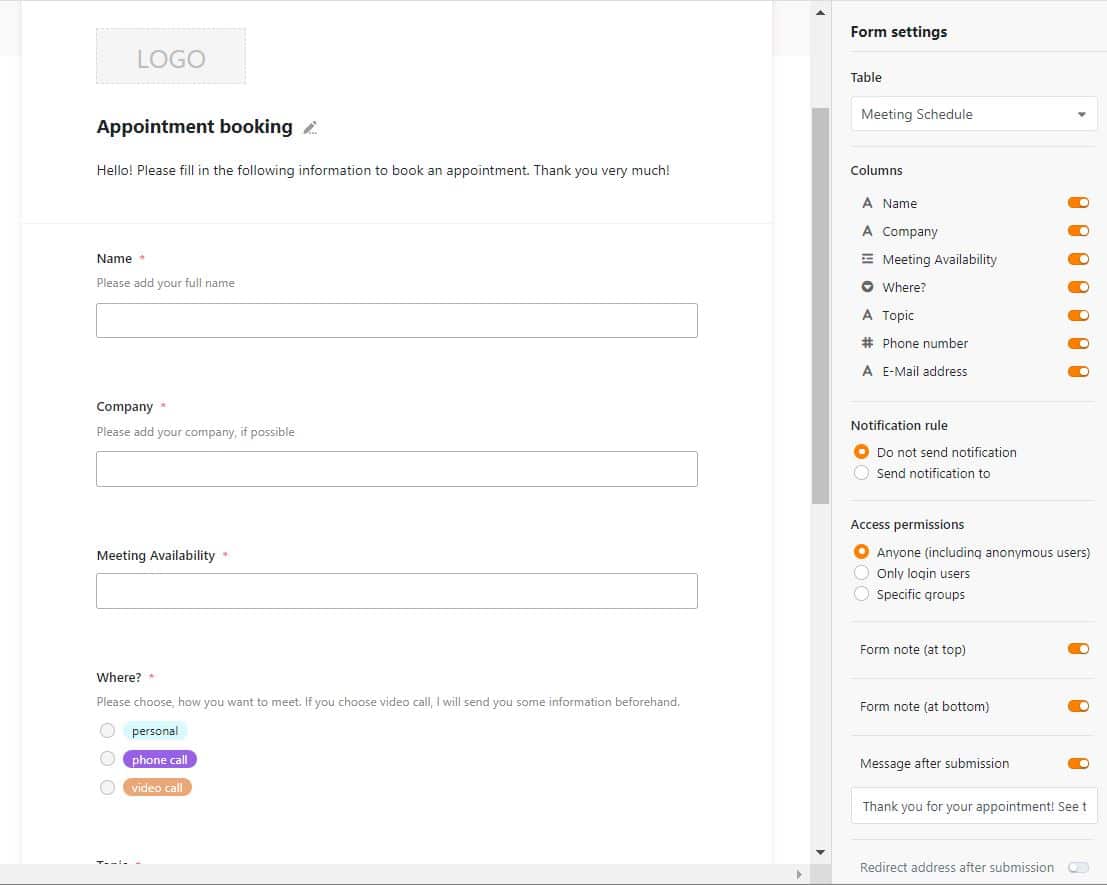
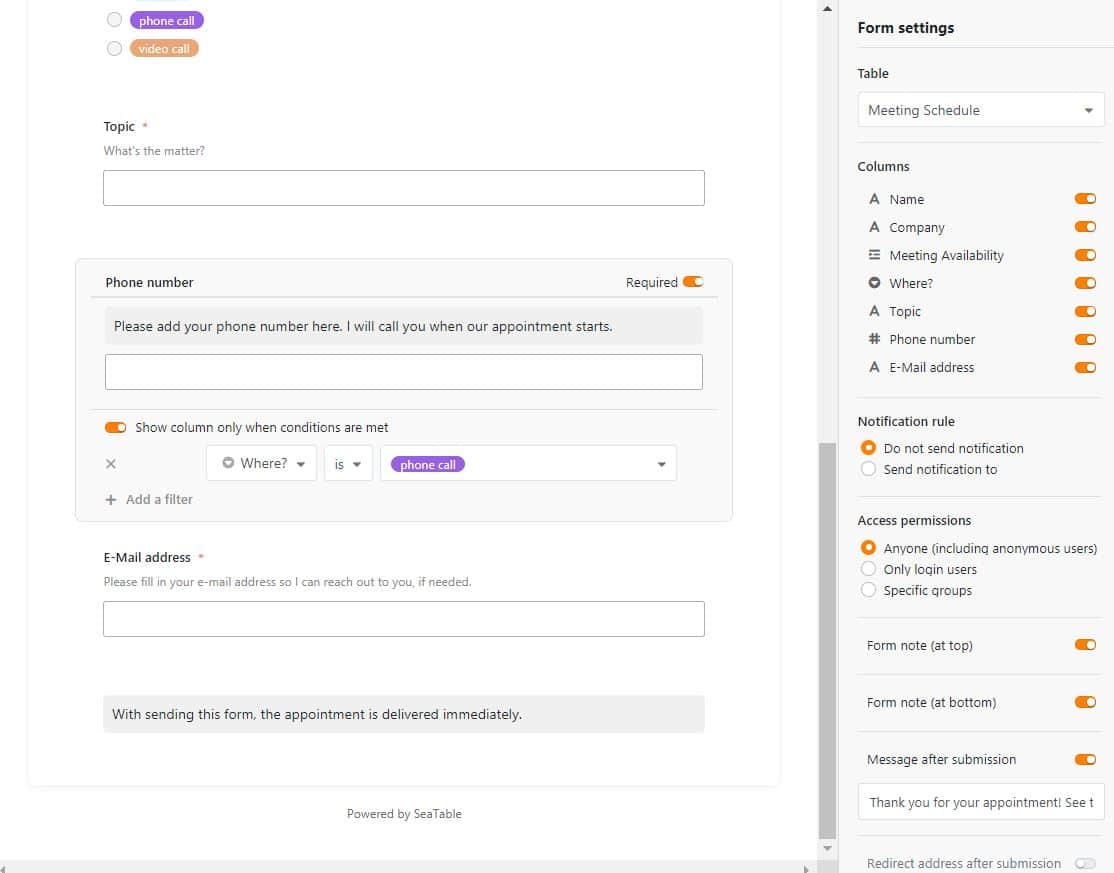
Sie können Ihr Formular ganz nach Ihren Wünschen beschriften. Informationen in Form von form notes geben den Teilnehmern hilfreiche Hinweise, was es in Ihrem Terminbuchungssystem zu beachten gibt.
Sie können Auswahlmöglichkeiten auch an Bedingungen knüpfen. In unserem Beispiel gibt es drei Möglichkeiten, den Termin abzuhalten: Persönlich, per Videocall oder per Telefon. Im Falle eines Telefonats ist die Nummer des Teilnehmers zwingend notwendig, daher wurde die Spalte “Phone Number” an die Bedingung geknüpft, erst zu erscheinen, wenn die Option “Phone call” ausgewählt wurde.
Termine begrenzen – so geht keine Buchung mehr schief
Vergebene Termine sollten anderen Teilnehmern natürlich nicht mehr angeboten werden, ebenso wenig wie Termine, die in der Vergangenheit liegen. Das kann zum einen mit der Verknüpfung von Calendly und SeaTable erfolgen, wenn Sie dieses System bereits nutzen.
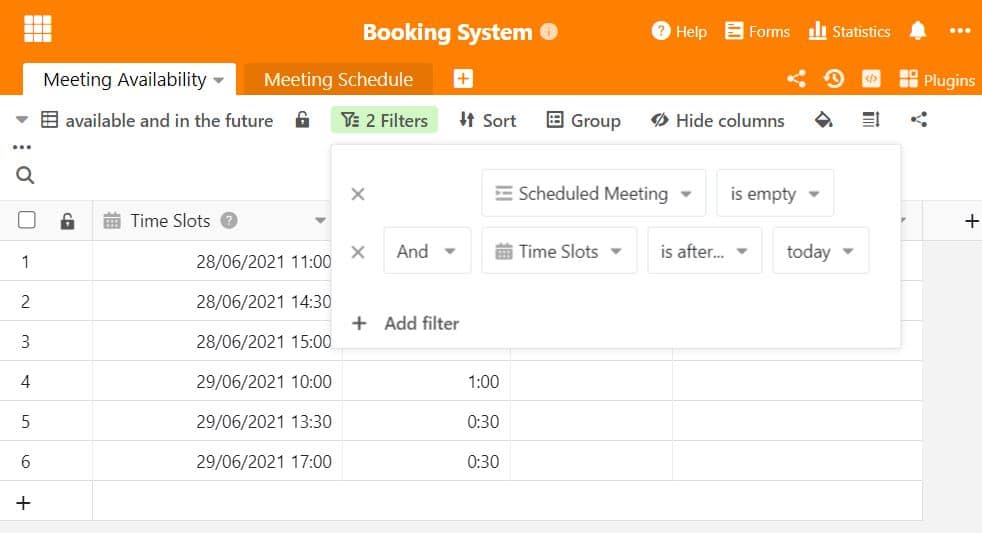
Mit SeaTable sind zum anderen aber nur ein paar kleine Handgriffe nötig, um Ihr Terminbuchungssystem darauf einzustellen. Zunächst ist es wichtig, in Tabelle 1 eine zweite Ansicht für die Termine zu erstellen, und diese mit zwei Filtern zu versehen. Zum einen sollen vergebene Termine nicht mehr als Auswahlmöglichkeit angeboten werden, dafür wird ein Filter eingestellt, der nur leere Zeilen aus der Spalte “Scheduled Meetings” anzeigt: So lautet der Befehl also “Scheduled Meeting is empty”.
Damit auch nur Termine in der Zukunft angezeigt werden, und nicht die von letzter Woche, muss ein zweiter Filter eingestellt werden: Mit der Bedingung “And” und dem Filter “Time Slots after today” werden nur noch Termine ab dem aktuellen Tag angezeigt. Auf diese Weise haben Sie nur noch freie und buchbare Zeitslots in dieser Ansicht.
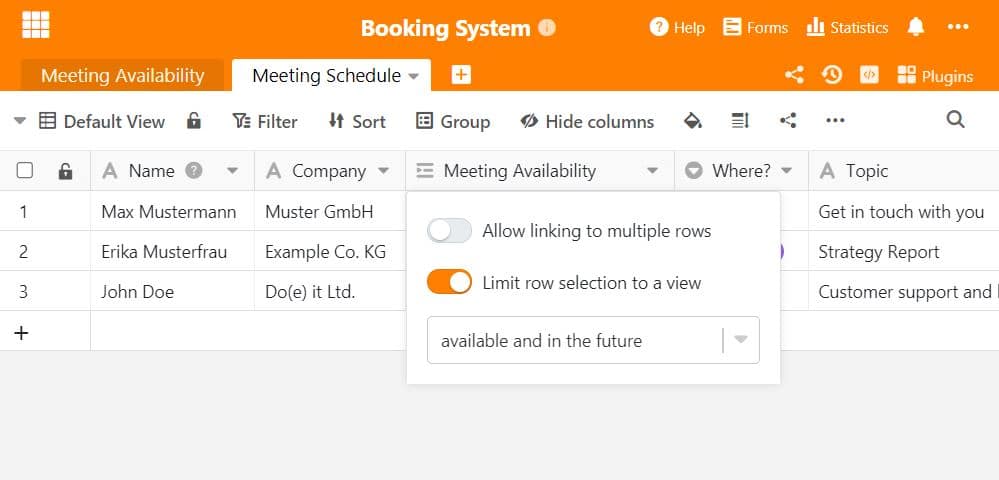 Damit dies auch im Terminbuchungssystem so übernommen wird, muss die Spalte in der Tabelle “Meeting Schedule” auch angepasst werden. Dafür müssen lediglich die Spalteneinstellungen geöffnet und die Zeilen auf eine Ansicht beschränkt werden. Hierzu wird die eben erstelle Ansicht mit den zwei Filtern ausgewählt und gleichzeitig die Funktion deaktiviert, bei der Teilnehmer mehrere Daten auswählen können. Das heißt: Es kann nur je ein Termin gebucht werden und es wird nur auf die freien und zukünftigen Daten aus der 2. Ansicht zugegriffen.
Sie können sich selbst unter den Benachrichtigungseinstellungen (drei Punkte rechts oben) einen automatisierten Benachrichtigungsmechanismus einbauen, der Sie etwa an bevorstehende Termine erinnert oder Sie darüber informiert, dass soeben ein Termin über das Terminbuchungssystem gebucht wurde.
Enorme Zeitersparnis durch hochflexibles Terminbuchungssystem von SeaTable
Sie können Ihr Formular jederzeit anpassen, wenn Sie merken, dass wichtige Informationen fehlen. Nachdem ein Teilnehmer seine Informationen abgeschickt hat, erscheinen diese sofort in der Tabelle “Meeting Schedule”. So haben Sie in wenigen Schritten ein einfaches und unkompliziertes Terminbuchungssystem erstellt, das ganz automatisch alle relevanten Informationen an einem Ort sammelt. Das Planen von Terminen wird so zum Kinderspiel! Unser Template kann Ihnen dabei helfen, eine Struktur in Ihr Terminbuchungssystem zu bringen.
In unserem YouTube-Tutorial haben wir noch einmal ganz genau erklärt, wie man ein Webformular mit SeaTable erstellt. Das lässt sich ganz einfach auf ein Terminbuchungssystem übertragen – probieren Sie es noch heute aus!

„*“ zeigt erforderliche Felder an
