Mithilfe von Automationen müssen Sie Zeilen mit bestimmten Einträgen nicht mehr manuell in Ihren Tabellen hinzufügen, sondern können diese Schritte automatisch ausführen lassen. Definieren Sie hierfür einfach eine entsprechende Automation für eine beliebige Tabellenansicht.
Wie Sie Zeilen mit einer Automation hinzufügen
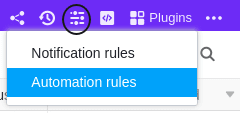
- Klicken Sie im Base-Header auf und im Anschluss auf Automatisierungsregeln.
- Klicken Sie auf Regel hinzufügen.
- Benennen Sie die Automation und legen Sie die Tabelle und Ansicht fest, in der diese wirken soll.
- Definieren Sie ein Trigger-Ereignis, welches die Automation auslöst.
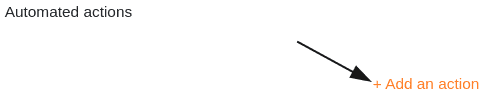
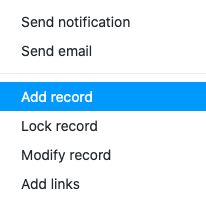
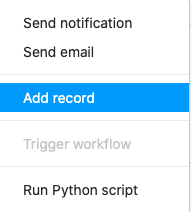
- Klicken Sie auf Aktion hinzufügen und wählen Sie als automatisierte Aktion Zeile hinzufügen aus.
- Bestätigen Sie mit Abschicken.
Anlegen der Automation
Definieren Sie für die Automation zunächst ein Trigger-Ereignis.
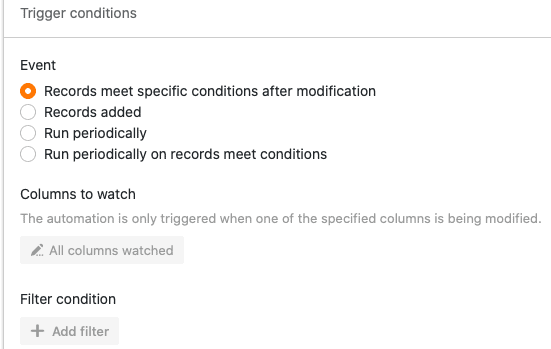
- “Ein neuer Eintrag wird hinzugefügt”
- “Einträge erfüllen nach Bearbeitung bestimmte Bedingungen“
- “Periodischer Trigger”
Wählen Sie anschließend als automatisierte Aktion Zeile hinzufügen aus.
Im nächsten Schritt definieren Sie die Einträge, die nach dem Auslösen der Automation in einer Zeile erscheinen sollen.
Mit einem Klick auf Feld hinzufügen können Sie jeweils einen beliebigen Eintrag definieren.

Wählen Sie zunächst die Spalte, in welche der Eintrag eingefügt werden soll.
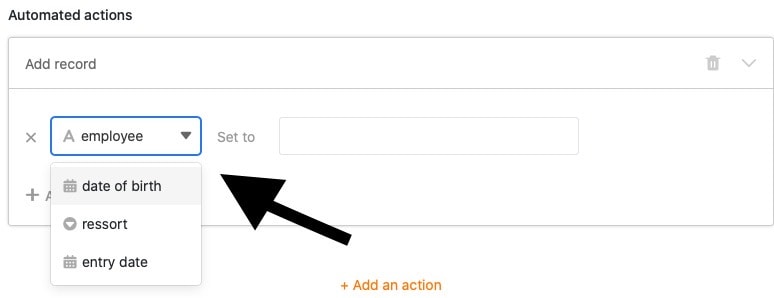
Anschließend können Sie den Eintrag definieren. Je nach ausgewähltem Spaltentyp stehen Ihnen dabei unterschiedliche Optionen zur Verfügung.

Aktivieren Sie abschließend die Automation mit einem Klick auf Abschicken.

Anwendungsbeispiel
Ein konkreter Anwendungsfall für diese Art von Automation könnte beispielsweise auftreten, wenn Sie in einer Tabelle Ihre wöchentlichen Team-Meetings erfassen. Dabei möchten Sie, dass jede Woche vor Beginn des Meetings schon automatisch eine Zeile mit bestimmten Einträgen angelegt wird, damit Sie nur noch die restlichen Informationen manuell eintragen müssen.
In diesem Zusammenhang könnten Sie unter anderem das Datum des Meetings, den Besprechungsraum und die feststehenden Themen vorab definieren.

Anlegen der Automation
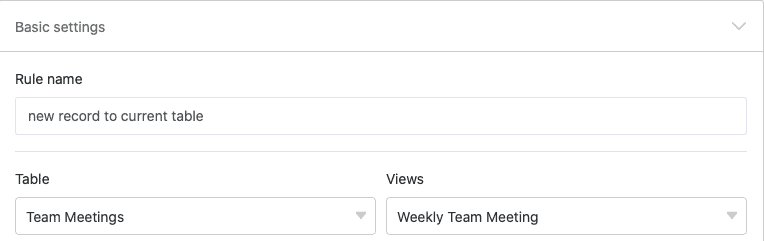
Als Erstes geben Sie der Automation einen Namen und wählen sowohl die Tabelle (hier: Team Meetings) als auch die Ansicht (hier: Weekly Team Meeting) aus, in der die Automation wirken soll.
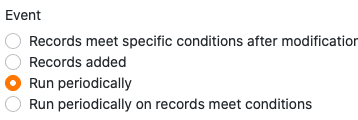
Als Trigger-Ereignis der Automation wählen Sie die Option Periodischer Trigger.
Definieren Sie anschließend, in welchen Abständen die Automation ausgeführt werden soll. Damit die Zeile mit den entsprechenden Einträgen jede Woche der Tabelle hinzugefügt wird, wählen Sie wöchentlich.
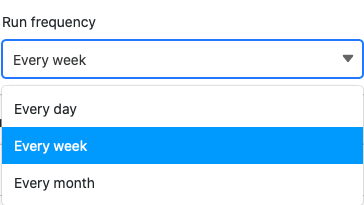
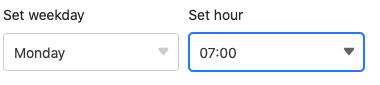
Des Weiteren können Sie sowohl einen konkreten Wochentag als auch eine konkrete Uhrzeit auswählen, zu welcher die Automation ausgelöst wird. In unserem Anwendungsfall bietet es sich an, als Zeitpunkt eine Stunde vor Beginn des wöchentlichen Meetings am Montagmorgen auszuwählen.
Als automatisierte Aktion definieren Sie im nächsten Schritt die Aktion Zeile hinzufügen.
Mit einem Klick auf Feld hinzufügen können Sie beliebig viele Einträge definieren, die automatisch in der Zeile erscheinen.
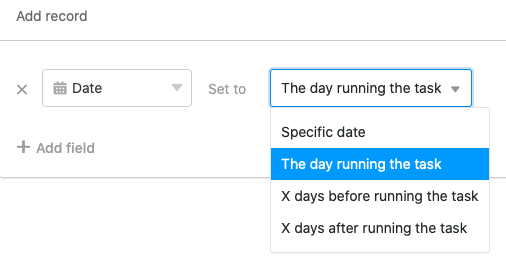
Damit in der Zeile automatisch das jeweilige Datum des am selben Tag anstehenden Team-Meetings erfasst wird, wählen Sie die Datum-Spalte und den Wert Der Tag der Ausführung aus.
Sie können mit einem Klick auf Feld hinzufügen beliebig viele weitere Einträge definieren, mit denen die Zeile nach Auslösung der Automation gefüllt wird. Wählen Sie hierzu einfach eine entsprechende Spalte Ihrer Tabelle aus dem Drop-down-Menü aus und definieren Sie einen Wert im nebenstehenden Eingabefeld.
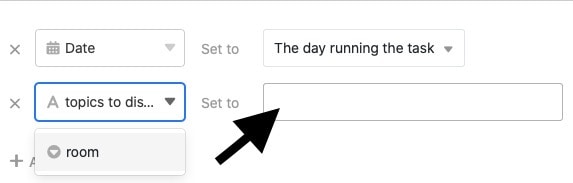
Wenn das Team-Meeting zum Beispiel üblicherweise in einem bestimmten Raum stattfindet, können Sie diesen Raum als gesetzten Wert definieren. Auch falls gewisse Themen (wie z. B. Neuzugänge/Austritte/Jubiläen) bei jedem Team-Meeting auf der Agenda stehen, können Sie diese immer in die Zeile eintragen lassen.
Testen der Automation
Wenn die Automation funktioniert wie gewünscht, fügt SeaTable Ihrer Tabelle nach Auslösung des periodischen Triggers (hier: immer montags um 7 Uhr) automatisch eine Zeile mit den zuvor definierten Einträgen hinzu. Dies erspart Ihnen einige Tastenanschläge und Sie können daraufhin die noch offenen Daten manuell eintragen.

Anpassungen an den automatisch hinzugefügten Einträgen sind zwar jederzeit möglich, schränken jedoch den Nutzen der Automatisierung erheblich ein.
