Mit der Eröffnung neuer Standorte wächst neben dem Umsatz auch der organisatorische Aufwand. Nun ist es wichtig, den Überblick zu behalten. Unser Store Management Template hilft Ihnen bei folgenden Fragen: Wo sind Ihre umsatzstärksten Filialen? Welche Filialen brauchen mehr Aufmerksamkeit, weil sie den prognostizierten Umsatz nicht erreicht haben? Wo werden neue Mitarbeiter gebraucht und wie ist die Qualität ihrer eingestellten Mitarbeiter? Welche Mitarbeiter können welche Fortbildungen gebrauchen?
Zudem wird auch Ihr Sales-Team mit neuen Herausforderungen konfrontiert: Es gibt mehr Filialen, die in regelmäßigem Abstand geprüft werden müssen. Das heißt: Mehr Termine und wachsender Bedarf. Es gilt strukturiert zu arbeiten und Prozesse mithilfe unserer Store Management Lösung zu vereinfachen.
SeaTable als Organisationstool für Ihr Store Management
Im Store Management gibt es einiges zu beachten. Unsere Softwarelösung hilft Ihnen dabei, den Überblick über Mitarbeiter und Weiterbildungen zu behalten. Sie zeigt Ihnen den Umsatz in verschiedenen Umsatzclustern an und bietet mit unserem Statistik-Plugin auch Grundlage für verschiedene Umsatzanalysen. Für Ihre Sales Manager bietet SeaTable ein einfaches Webformular, mit welchem Store-Checks organisierter gestaltet werden können.
Das Timeline-Plugin auch alle anstehenden Termine an. Zu guter Letzt hilft Ihnen unser Store Management Template auch bei der Bestellung und Übersicht aller POS-Materialien in allen Filialen. Im Folgenden werden wir Ihnen erklären, wie genau das Template aufgebaut ist und wie Sie es benutzen können.
Hier gelangen Sie direkt zu unserem Template
Behalten Sie den Überblick über alle Filialstandorte und deren Mitarbeiter
Ihre erste Tabelle “Stores” gibt Ihnen einen Überblick über alle Filialen. Hier sehen Sie die genaue Adresse, alle Mitarbeiter pro Filiale und den für die entsprechende Filiale zuständigen Sales Manager. Die Spalte, die Ihre Mitarbeiter anzeigt, ist verknüpft mit der zweiten Tabelle “Employees”. Hier sehen Sie eine vollständige Liste Ihrer Mitarbeiter pro Filiale. Neben einem Bild wird hier auch die jeweilige Position des Mitarbeiters angezeigt.
Die gesamte Zeile wird rot markiert, wenn der entsprechende Mitarbeiter ein Store Manager ist. So sehen Sie direkt, wer hauptverantwortlich für den Filialstandort ist. Markierung einzelner Zeilen können Sie ganz einfach mit dem kleinen Farbeimer oberhalb Ihrer Tabelle einstellen. Hier können Sie Regeln bestimmen, die die Zeile entsprechend einfärben. Zusätzlich finden in dieser Base auch die Kontaktdaten der einzelnen Mitarbeiter platz.
Eine zusätzliche Spalte für Dokumente ermöglicht Ihnen das Ablegen von Arbeitsverträgen oder Lebensläufen, so haben Sie alle wichtigen Dokumente an einem Ort. Eine weitere verknüpfte Spalte ist die Spalte “Trainings”, hier lassen sich in der nächsten Tabelle Weiterbildungen für Ihre Mitarbeiter organisieren.
Weiterbildungen für Ihre Mitarbeiter organisieren
Da Mitarbeiter eine der wichtigsten Ressourcen für Unternehmen sind, liegt es im Interesse der Unternehmen, diese Ressourcen zu fördern und dadurch noch wertvoller zu machen. Weiterbildungen können demnach als nachhaltige Investitionen in das Unternehmen betrachtet werden. Denn das neue Wissen, das sich Ihre Mitarbeiter aneignen, kommt nicht nur ihnen, sondern auch dem ganzen Unternehmen zu Gute.
Unsere dritte Base “Trainings” verschafft Ihnen einen Überblick über die verschiedenen Bedürfnisse Ihrer Mitarbeiter und die damit verbundenen Weiterbildungsmöglichkeiten. Alle verfügbaren Weiterbildungen können Sie in die erste Spalte eintragen. Dann tragen Sie das Datum ein, an welchem die Weiterbildung stattfindet. Eine weitere Spalte zeigt die verfügbaren Plätze für diese Fortbildung an.
Als Nächstes werden alle Mitarbeiter, die an der Weiterbildung teilnehmen sollen, durch eine verknüpfte Spalte eingetragen. Ist eine Weiterbildung ausgebucht, können Sie einen Haken in der nächsten Spalte setzen. Anschließend wird sich die Zeile von Grün in Rot einfärben, so sehen Sie direkt, welche Weiterbildungen noch verfügbar sind und welche für diesen Termin bereits ausgebucht sind. Zu guter Letzt können Sie noch einen Haken setzen, wenn alle Mitarbeiter bei der entsprechenden Weiterbildung angemeldet sind.
Wenn Ihr Personalmanagement komplexer wird und die Zahl der Weiterbildungen wächst, können wir Ihnen dieses Template empfehlen. Hier dreht sich alles nur um Weiterbildungen und interne Workshops.
Behalten Sie den Überblick über Ihre Umsätze
Im Store Management ist es entscheidend, die Umsätze Ihrer einzelnen Filialen im Blick zu behalten. Das ist nicht nur für eine Ist-Analyse entscheiden, sondern auch für die zukünftige strategische Standortplanung. In Ihrer Revenue Base können Sie Umsatzzahlen einsehen und analysieren.
Wir haben die gesamte Base nach Quartal gruppiert. In Ihren Gruppierungsregeln können sie ganz einfach einstellen, nach welcher Spalte die gesamte Base geordnet werden soll. Sortieren Sie lieber nach Jahren oder nach Filiale, können Sie diese Anpassung selbstverständlich ganz einfach vornehmen, indem Sie die Gruppierungsregeln ändern.
Mit einer Spalte für Ihr Umsatzpotenzial und dem tatsächlichen Umsatz lassen sich Defizite und Potenziale ganz einfach erkennen. Zudem haben wir einen Umsatzcluster eingefügt, der Ihre Filialen nach Umsatz kategorisieren und die Zeile wieder entsprechend einfärben soll. Unser gewähltes Cluster ist natürlich ganz einfach auf Ihre Bedürfnisse anpassbar. Ändern sie hierfür ganz einfach in der letzten Spalte die Single-Select Optionen in das von Ihnen präferierte Cluster.
Analysieren Sie Ihren Umsatz mithilfe des Advanced Statistik Plugins
Mit unserem Advanced Statistic Plugin lassen sich ganz einfach Analysen über Ihre Umsätze durchführen. Wir haben bereits drei nützliche Statistiken für unser Beispiel-Template erstellt. Sie gelangen über einen Klick auf das Plug-in oberhalb Ihrer Tabelle direkt in den Statistikbereich. Hier können Sie sich mithilfe des + Zeichens neue Dashboards erstellen, in welche Sie dann mehrere Statistiken einfügen können.
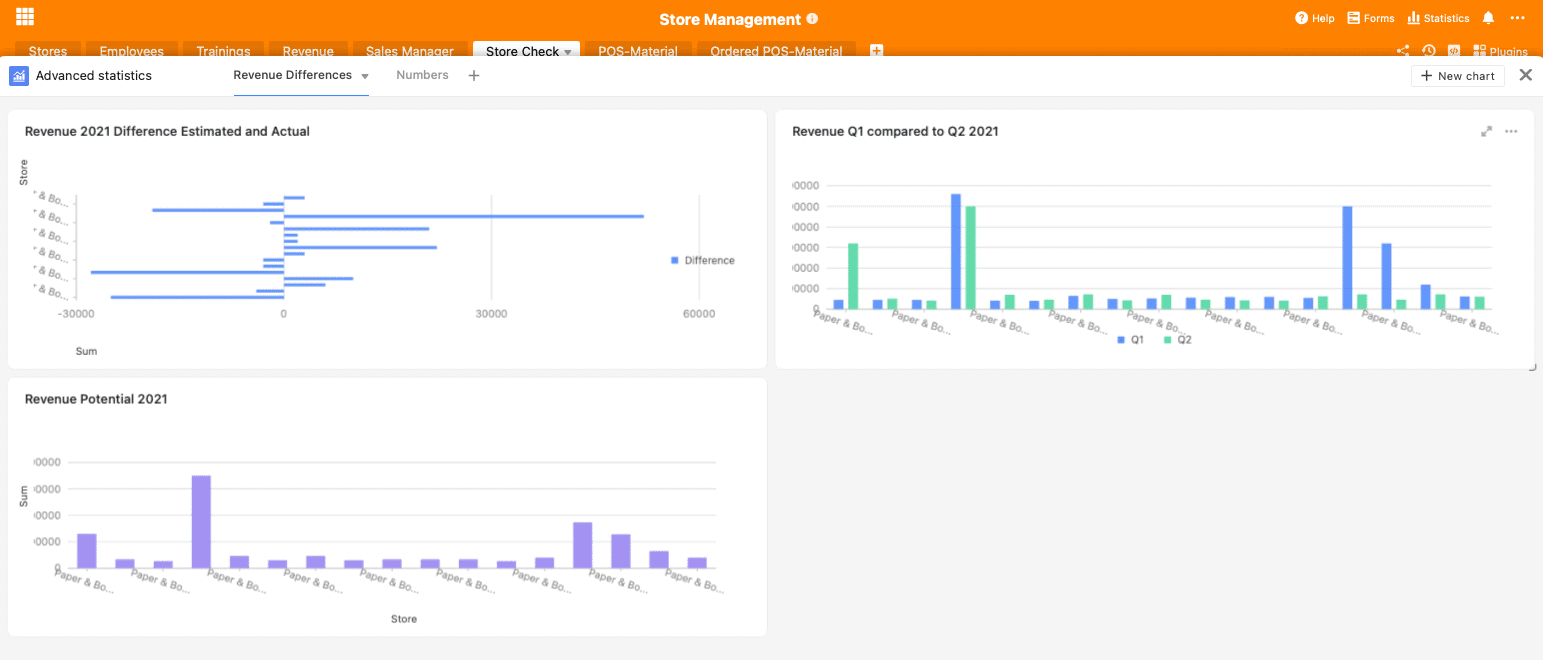
In unserem Beispiel hier zeigt Ihnen die erste Statistik die Differenzen zwischen Umsatzpotenzial und tatsächlichem Umsatz an. Die zweite Statistik zeigt Ihnen das Umsatzpotenzial pro Store. So können Sie direkt sehen, welche Filialen in diesem Quartal einen besonders hohen Umsatz erwarten können und Ihren Fokus hierauf legen. Die letzte Statistik vergleicht den Q1 Umsatz mit dem Q2 Umsatz, so können sie starke Differenzen und mögliche Fehlerquellen ausmachen.
Um weitere Statistiken hinzuzufügen, klicken Sie einfach im Plug-in Menü auf “+new chart”. Im Statistikmodul können Sie dann alle gewünschten Einstellungen vornehmen und die für Ihre Analysen nützlichen Statistiken erstellen.
Unser Map-Plug-in eignet sich für geografische Umsatzanalysen
Um einen geografischen Überblick über Ihre Umsätze zu erhalten, vielleicht um zu sehen, in welchen Regionen Ihr Produkt oder Ihre Dienstleistung besonders gut ankommt, gibt es das Map-Plug-in. Mit einem Klick auf Map werden Ihnen alle Filialen in der Farbe des entsprechenden Umsatzclusters angezeigt. So sind umsatzstarke und umsatzschwache Regionen sofort zu erkennen. Dies liefert Ihnen wichtige Entscheidungskriterien, wenn es um die strategische Standortplanung geht.
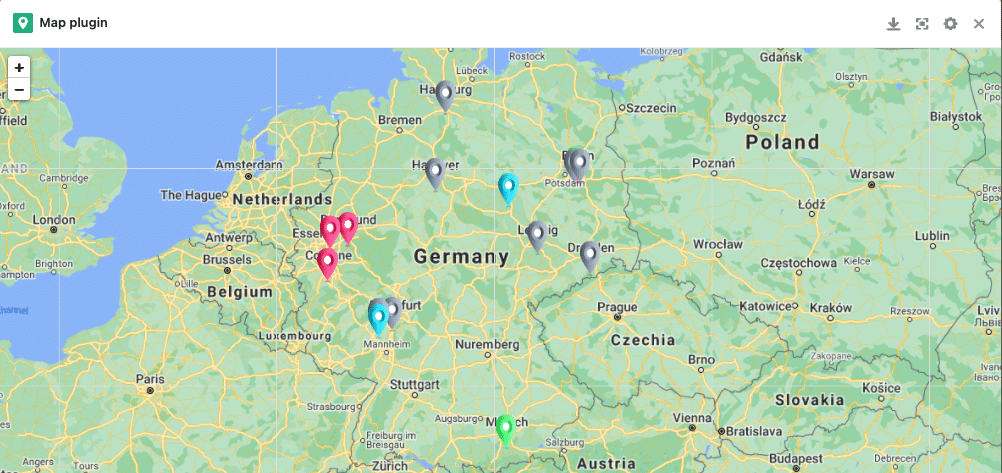
Karten Plug-In mit Umsätzen der einzelnen Filialen
Sehen Sie die Zuständigkeiten Ihres Sales-Teams
Um einen Überblick über die Zuständigkeiten Ihres Sales-Teams zu behalten, haben wir eine Kontaktdatentabelle angelegt, in welcher Sie Mailadressen, Telefonnummer und Store-Verantwortlichkeiten Ihrer Sales Manager finden.
So unterstützt unsere Store Management Lösung Ihr Sales-Team
Mit steigender Zahl an Filialen haben auch Ihre Salesmanager mehr zu tun. Ihre Salesmanager haben im Store Management Prozess je nach Unternehmensart zum Beispiel folgende Aufgaben:
- Regelmäßiges Besuchen der Filialen
- Überprüfung verwendeter POS-Materialien
- Überprüfung des allgemeinen äußeren und inneren Erscheinungsbildes
- Überprüfung, ob alle Standards eingehalten werden
- Mitarbeitergespräche führen und Arbeitsqualität überprüfen
Für all diese Aufgaben bietet unser Store Management Template eine Lösung an.
Alle Termine im Blick –mit dem Timeline-Plug-in
Über das Timeline-Plug-in sehen Ihre Sales-Mitarbeiter, wann die nächsten Termine für einen persönlichen Besuch in den ihnen zugeordneten Stores anstehen. Da wir für jeden Mitarbeiter in dieser Base eine eigene Ansicht erstellt haben, die wir weiter unten noch einmal erklären, findet sich auch im Timeline-Plug-in eine eigene Timeline für jeden einzelnen Mitarbeiter. Möchten Sie hier neue Timelines für neue Mitarbeiter hinzufügen, so müssen Sie, nachdem die neue Ansicht in der Base erstellt wurde, auch im Timeline-Plug-in eine neue Ansicht erstellen. In den Einstellungen können Sie dann die entsprechende Ansicht als Grundlage für die Datenquelle angeben.
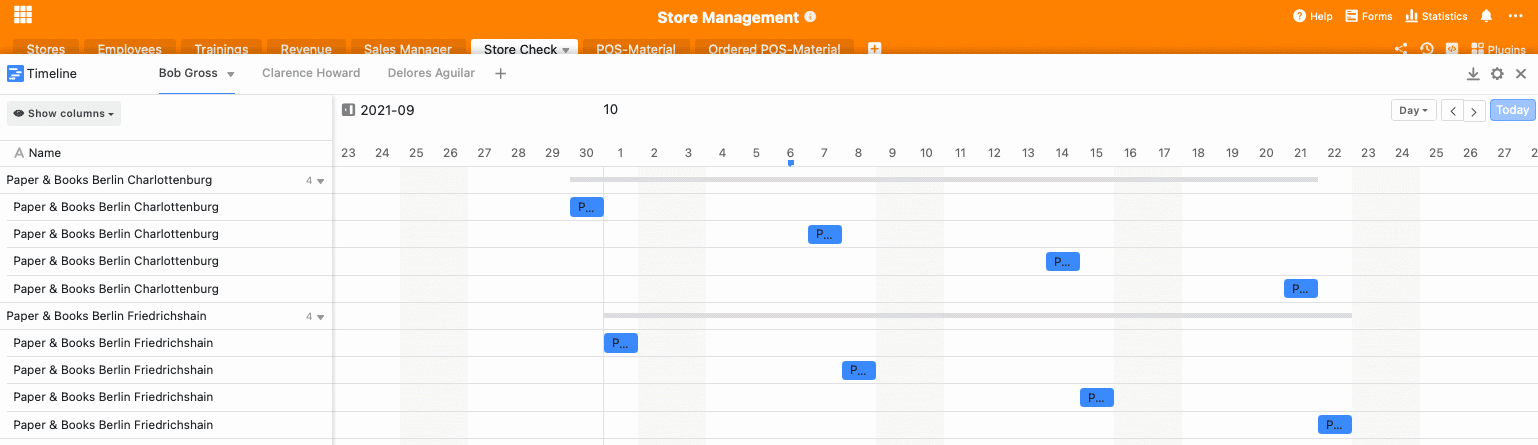
Timeline-Plug-in
Store Checks ganz einfach über Webformulare durchführen
Ihre Sales Mitarbeiter haben bei jedem persönlichen Filialbesuch die Aufgabe, je nach Unternehmensart verschiedene Aspekte auf Ihre Richtigkeit hin zu überprüfen. Hierfür haben wir ein Webformular eingerichtet, welches ganz einfach während oder nach dem Besuchen des Stores von Ihren Sales Mitarbeitern ausgefüllt werden kann. Sie finden die Webformulare oben rechts unter “Forms”. Klickt Ihr Sales Manager auf das Webformular, so kann er direkt mit dem Ausfüllen beginnen.
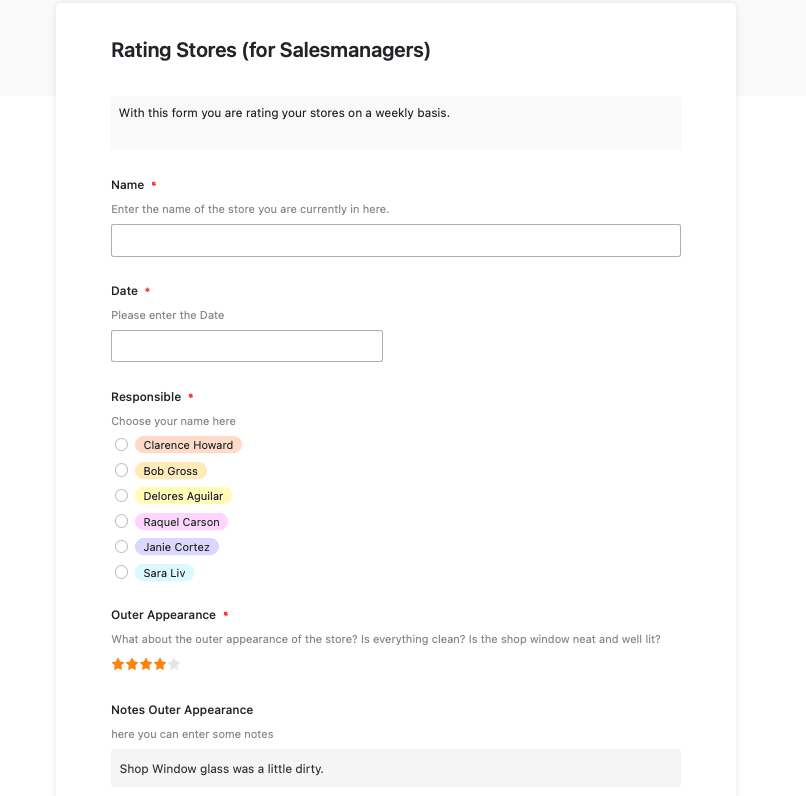
Webformular für den Store Check
Die zugrunde liegende Tabelle bleibt die Tabelle “Store Check”. Jeder Eintrag über ein Webformular erscheint in den Zeilen und Spalten dieser Tabelle.
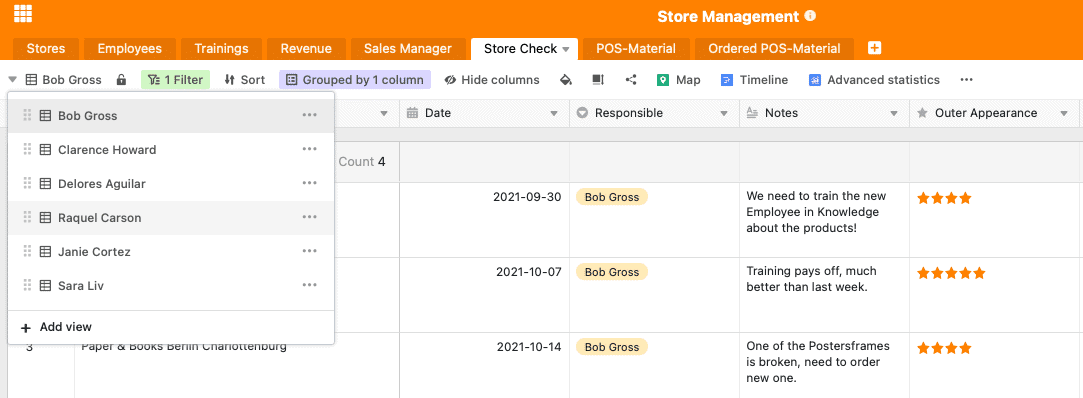
Personalisierte Ansichten für Ihre Sales Mitarbeiter
Jeder Salesmitarbeiter hat in diesem Template eine personalisierte Ansicht, damit er nur die Filialen sieht, für die er zuständig ist. Die Ansicht wurde mit der Filterregel über die Spalte “Responsible” mit dem jeweiligen Namen erstellt. Wählen Ihre Salesmitarbeiter im Webformular dann ihren Namen aus, so erscheinen die Store Checks auch in der entsprechenden Base.
Um das Ausfüllen des Webformulars weniger fehleranfällig zu machen, haben wir jedes auszufüllende Feld auf “required” gestellt. Das macht ein Absenden ohne das Ausfüllen des Feldes nicht möglich. Diese und viele weitere Einstellungen, wie zum Beispiel Hilfstexte zum Ausfüllen des Webformulars oder verschiedenen Formatierungsmöglichkeiten, können Sie ganz einfach vornehmen, indem Sie neben dem Webformular auf den kleinen Stift klicken.
Einfaches Bestellen von POS-Materialien
Für die Förderung Ihres Verkaufes am Point of Sale gibt es unzählige Materialien. Damit Sie den Überblick über die vorhanden POS-Materialien behalten und das Bestellen dieser ganz einfach möglich ist, gibt es die zwei Tabellen “POS-Material” und “Ordered POS-Material”.
Die Tabelle POS-Material ist eine Bestandsliste der momentan verfügbaren Materialien in den jeweiligen Stores. Wir haben diese Tabelle nach Stores gruppiert, sodass sich die jeweiligen Mitarbeiter im Store besser zurechtfinden können. Wenn Sie möchten, können Sie mithilfe der Filterregeln auch einzelne Ansichten für jeden Store erstellen.
In der Spalte “Item” können Sie mithilfe eines Single-Selects alle verfügbaren POS-Materialien eintragen. Der Status zeigt an, ob das Material im Store vorhanden ist, neues bestellt werden muss oder ob die Bestellung bereits aufgegeben ist. Der Bestand kann dann entsprechend von den Mitarbeitern vor Ort angepasst werden.
Die Bestellung der Waren läuft wieder ganz einfach über ein Webformular. Die über das Webformular “Order your POS-Material” bestellten Materialien erscheinen in der Tabelle “Ordered POS-Material”. Auch die Mengen erscheinen hier. Wurde das Material versendet, kann der Zuständige einen Haken setzen und die Aufgabe damit abschließen.
Über die Notification Rules können Sie Einstellungen über Benachrichtigungen bei bestimmten Triggerpunkten festlegen. So könnten Sie hier zum Beispiel einstellen, dass die Store-Manager eine Benachrichtigung über die versandten POS-Materialien per Mail erhalten. Notification Rules stellen Sie über die 3 kleinen Punkte neben der Glocke oben rechts in Ihrer Tabelle ein.
Store Management leicht gemacht mit SeaTable
Bringen Sie Ihren Workflow auf das nächste Level. Unser Store-Management Template finden Sie hier. Melden Sie sich gleich an und starten Sie kostenlos mit Ihrem neuen Template durch!

„*“ zeigt erforderliche Felder an
